Hi friends!
It’s all woodworking this issue, but the computer/electronics nonsense will likely return in the next newsletter.
Also: I’ll be in Taipei Apr 21–May 3, so drop me a line if you want to catch up over some 滷肉饭!
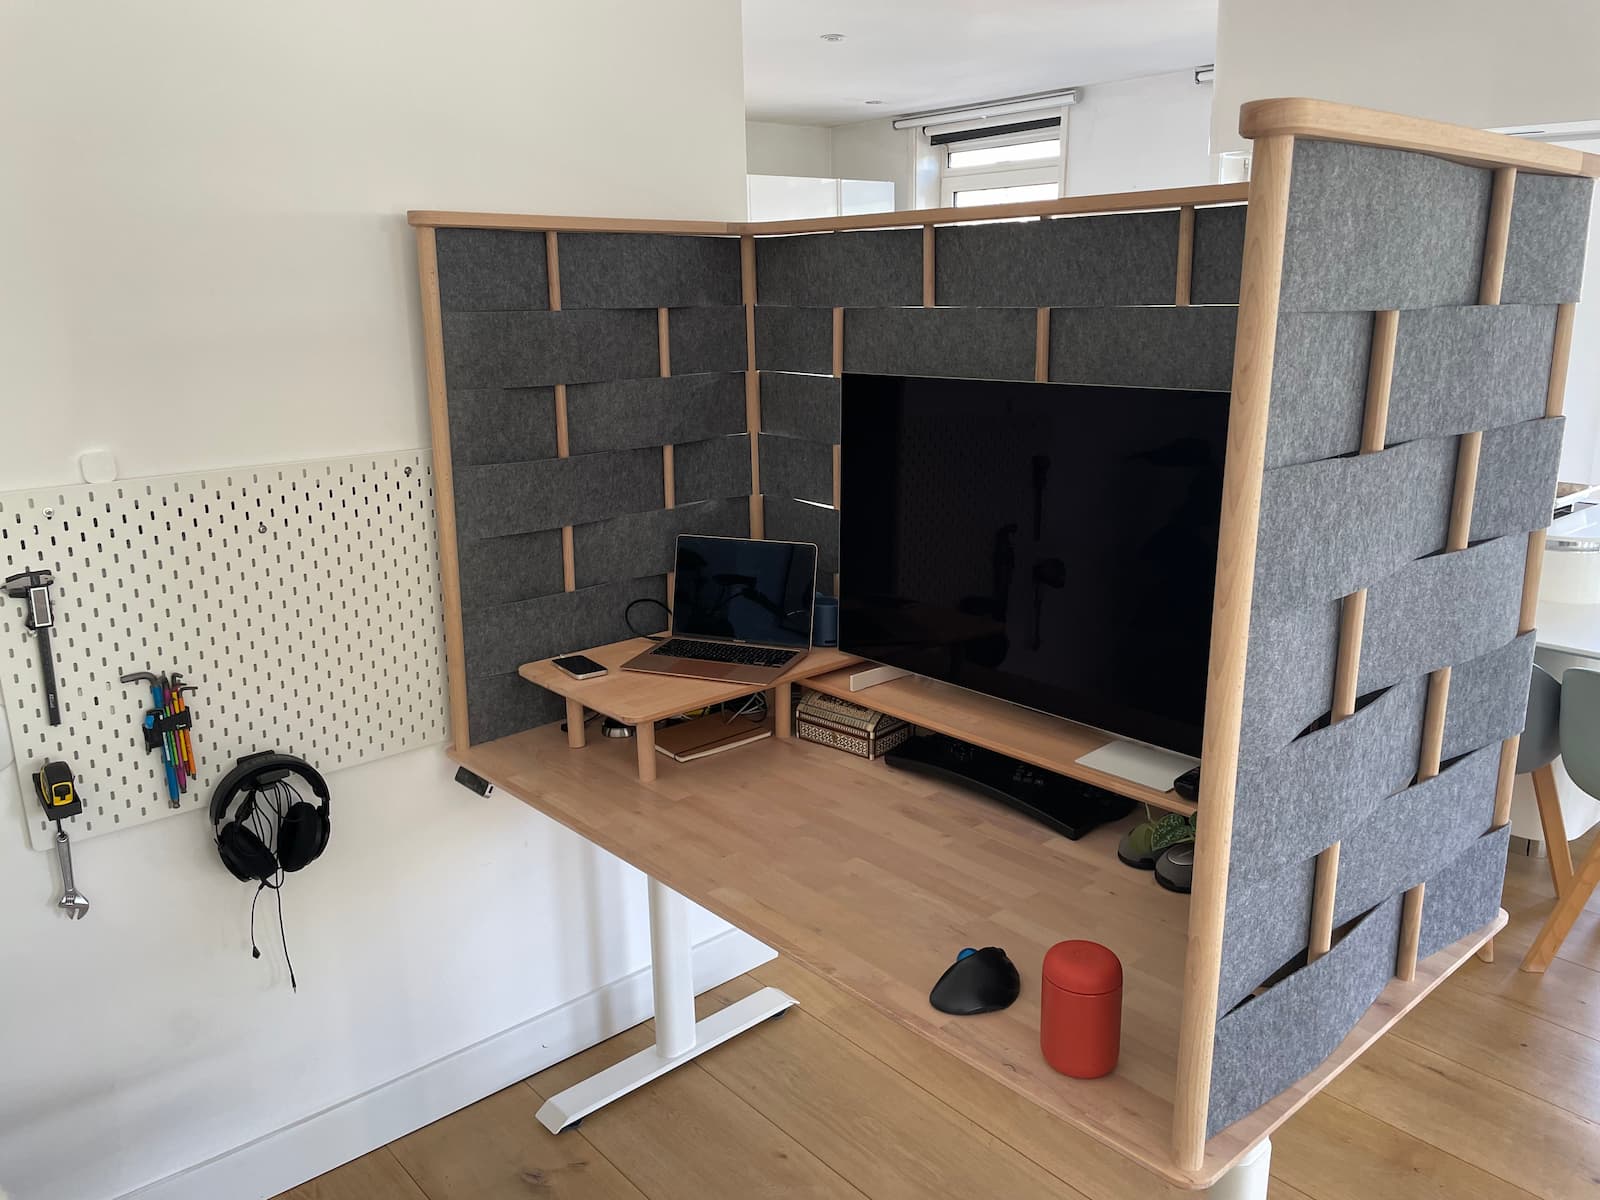
Building a floating castle desk
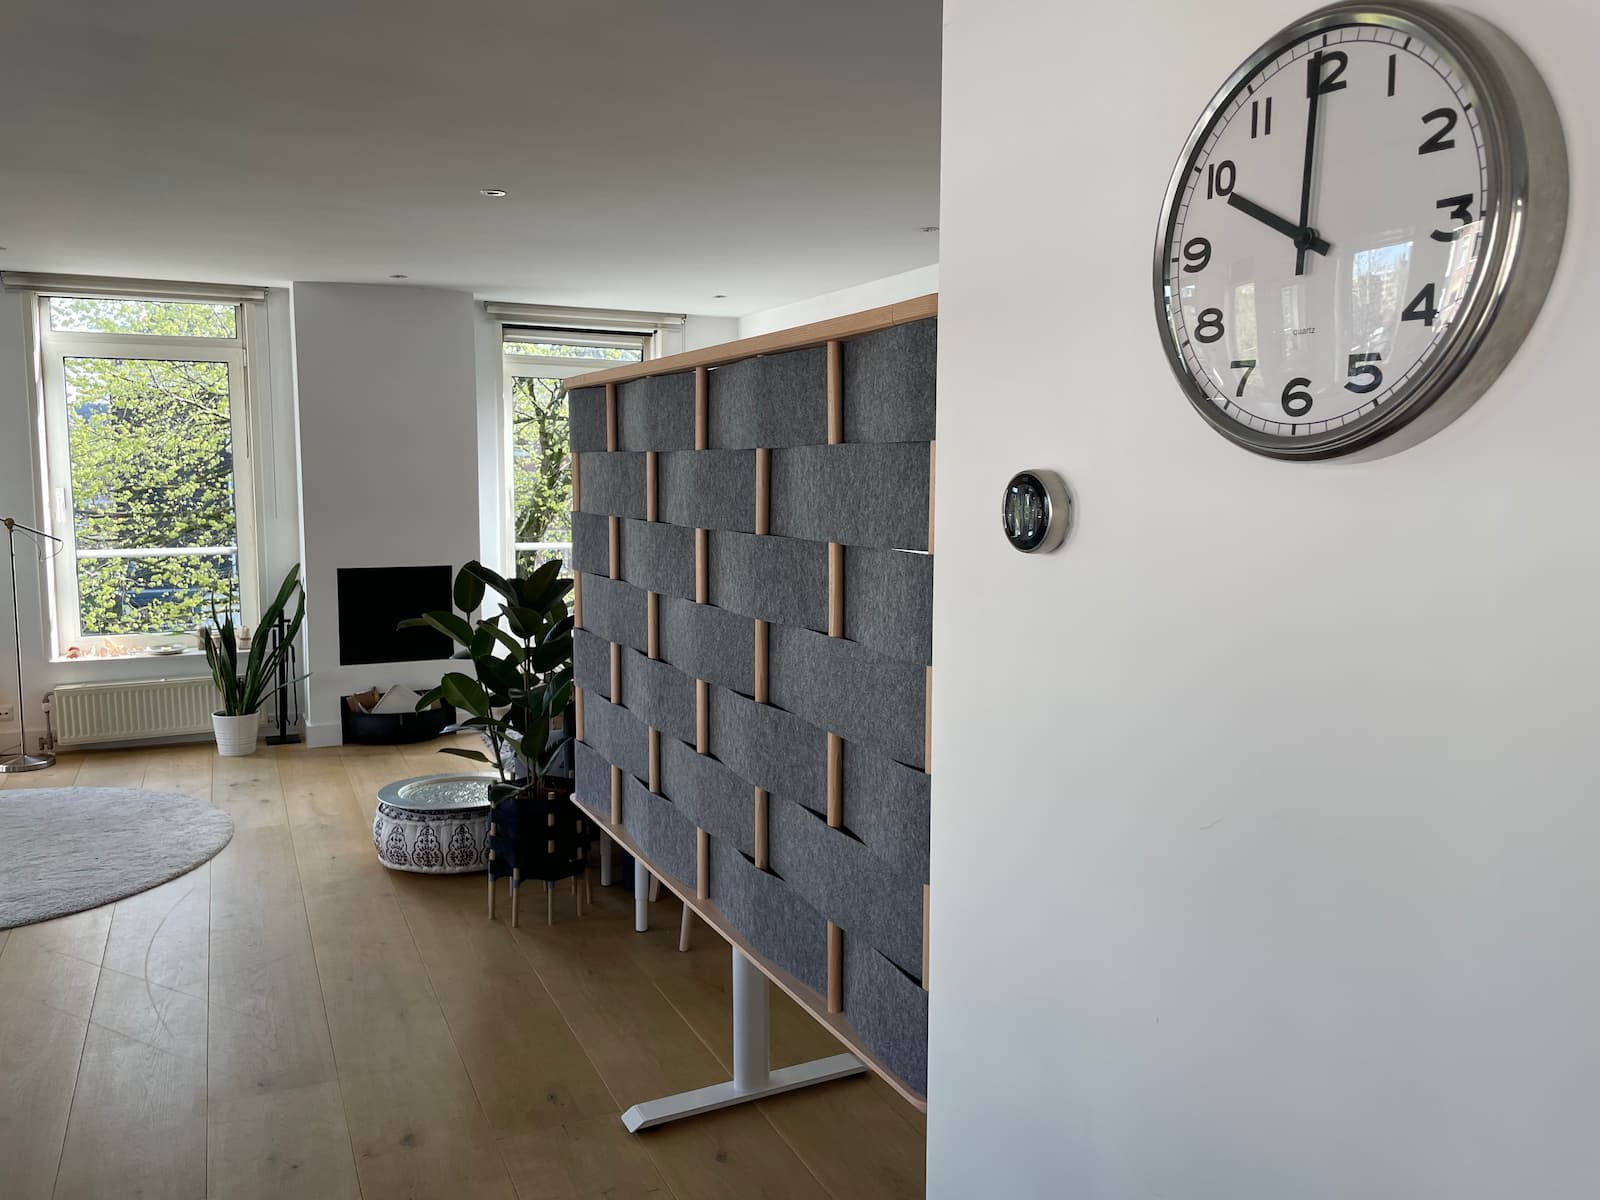
When I first moved to Amsterdam I asked y'all for advice on how to:
place a sit/stand desk and its giant-TV-as-monitor in a open kitchen/living plan without totally destroying the vibe
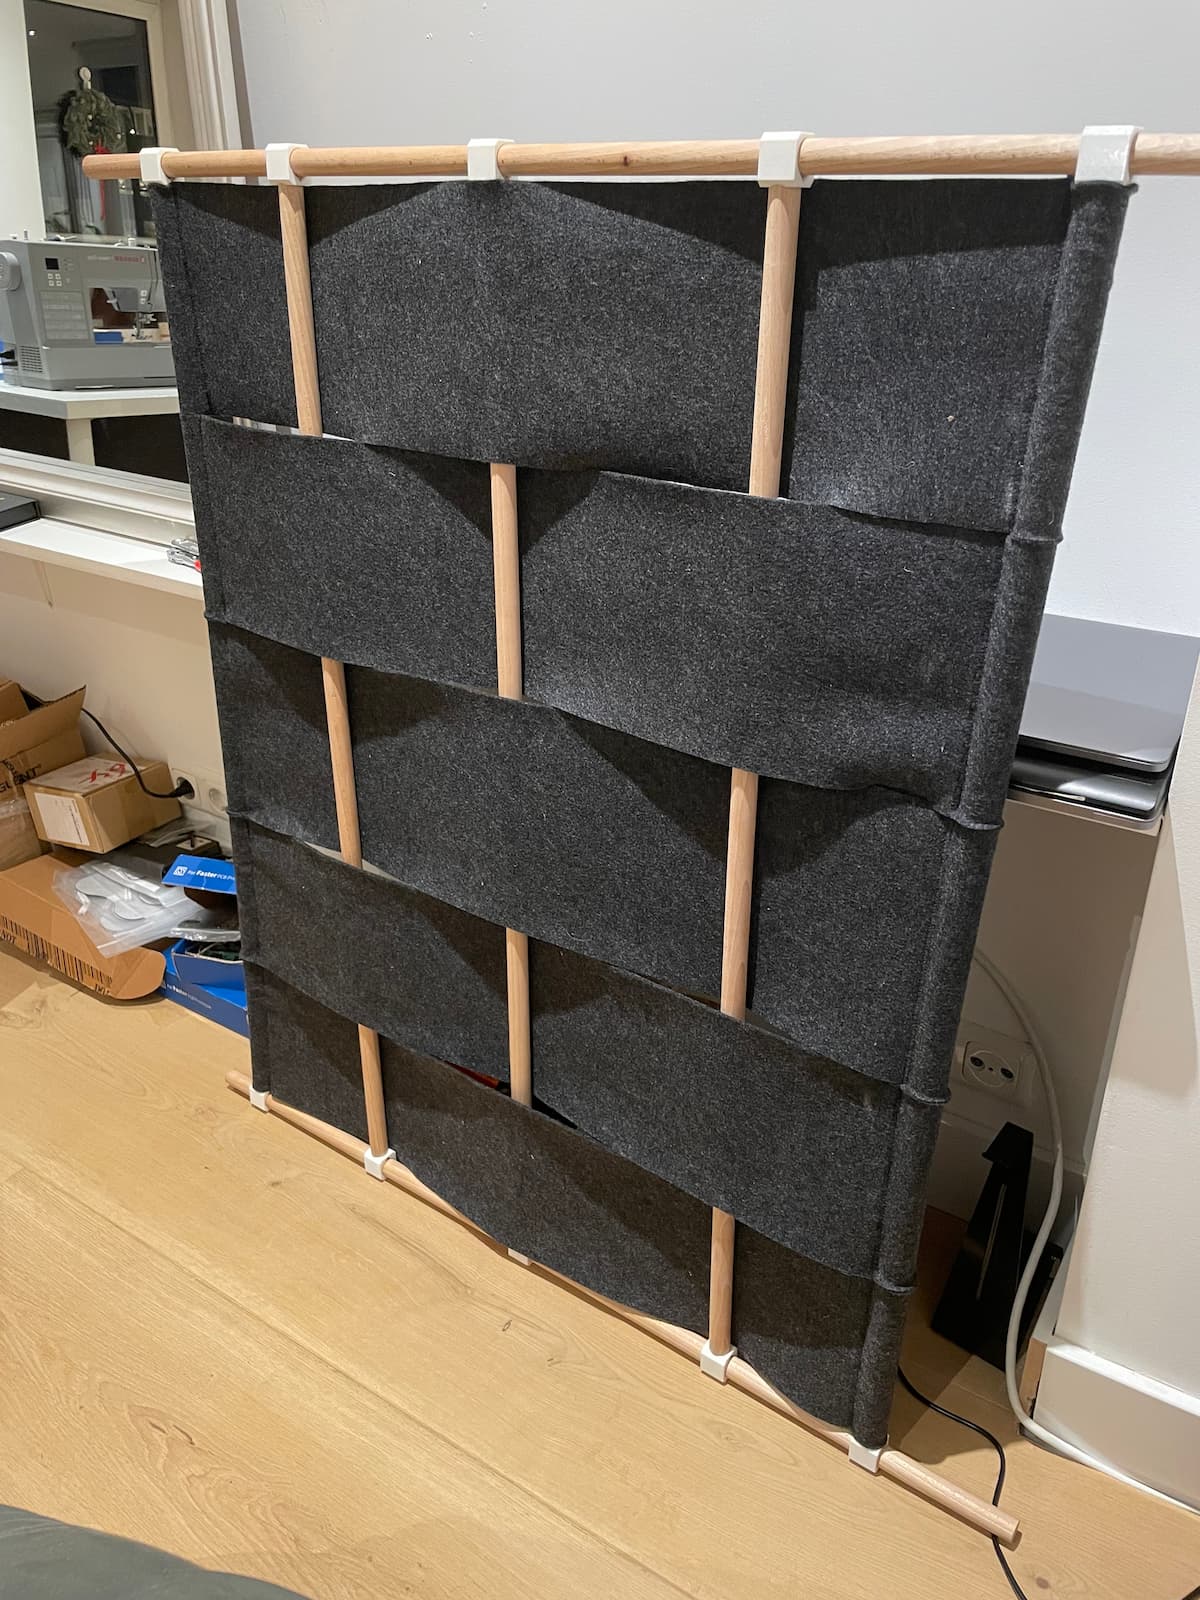
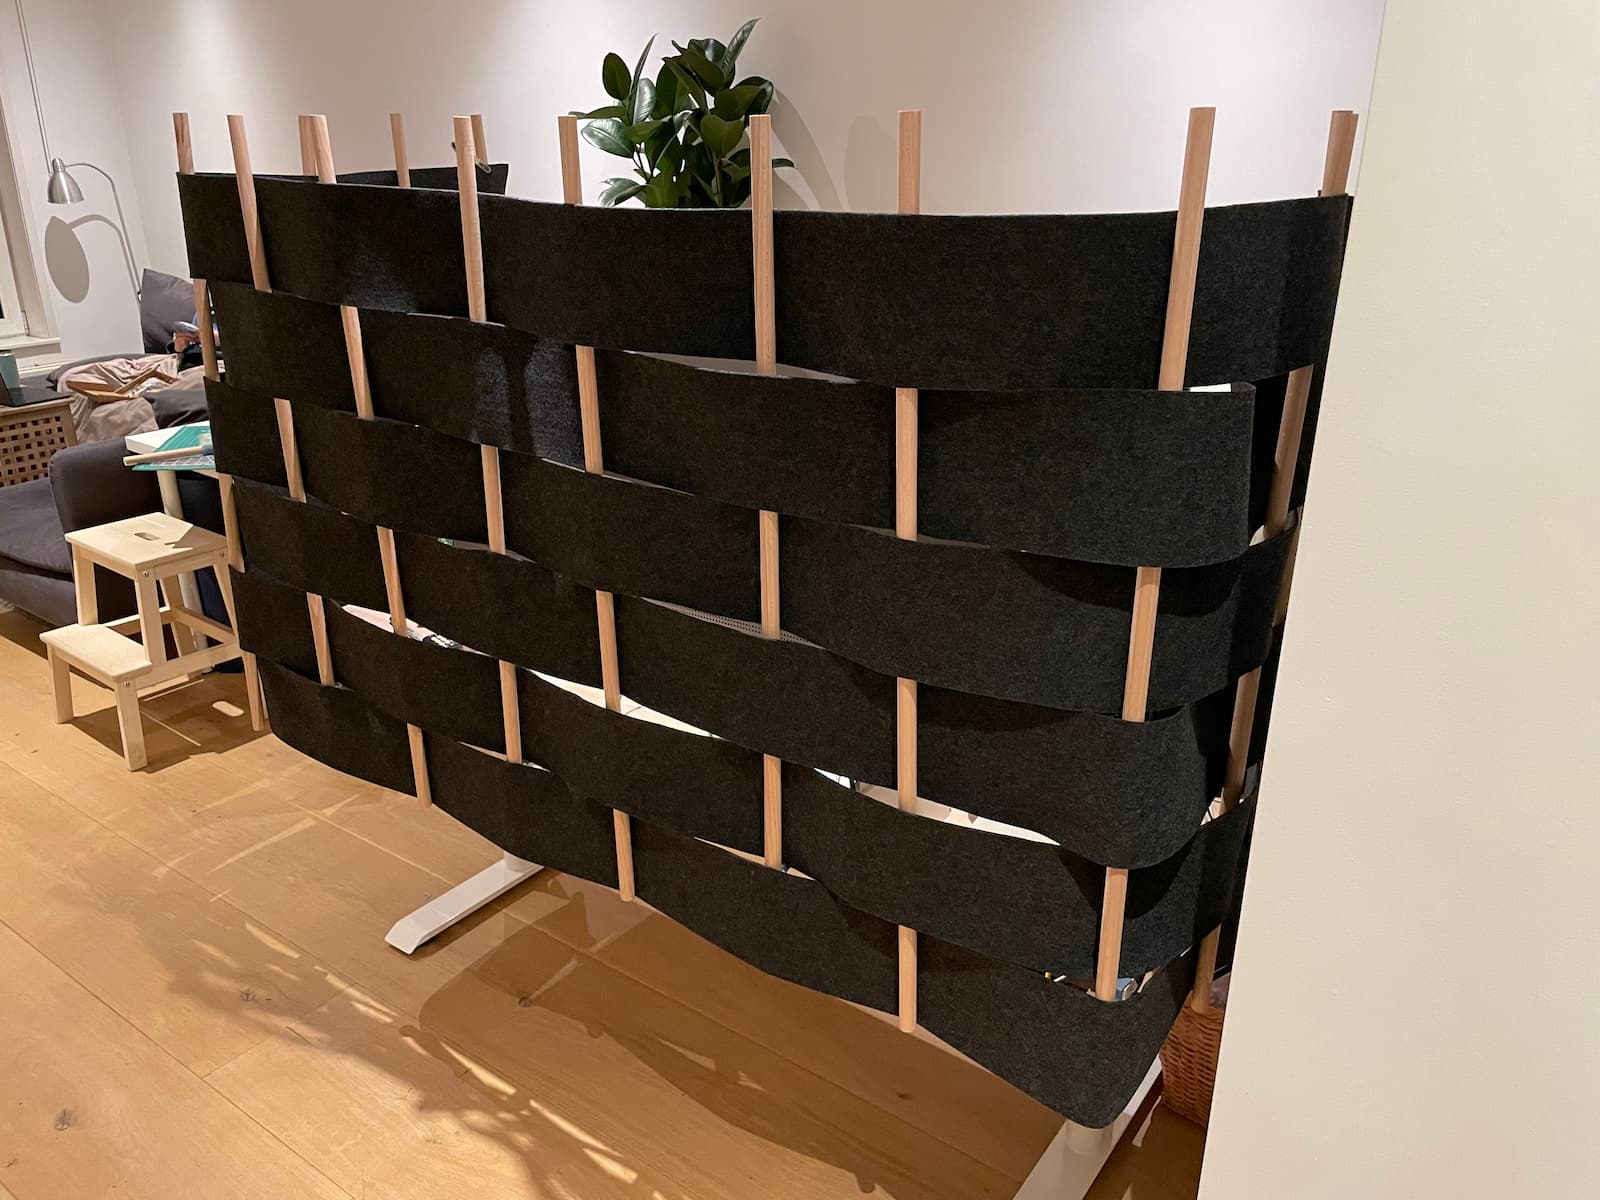
I’m pleased to report that I’ve solved this dilemma by building my own, uh, floating castle:
My original inspiration came via Pinterest, where I discovered Adam Goodrum’s Bower furniture collection and its theme of basket-woven felt.
The wood rod construction in particular appealed to me as I’d just moved to the Netherlands and had only a hand-saw, drill, and 3d-printer at my disposal. I figured I might be able to order wood rods online and combine them with 3d printed brackets. (It’s much easier to order wood rods when you have the right Dutch search term: “rondhout”.)
I prototyped a few ideas with clips and zip ties on the desk top, together with a printed top-rail:
However, this felt way too plastic / cheap, so I tried a horizontal wooden rail:
I still wasn’t happy with the 3d-printed connectors; they all felt too much like a kid’s toy or cheap plumbing equipment.
I decided to punt this aesthetic issue and build a full-sized prototype on the desk anyway, just to get a feel for the materials and scale:
I learned quite a bit doing this:
- I’d absolutely need a top rail, both for aesthetics (bare vertical rods just look unfinished) and also for stability: Despite trying about a dozen clip designs, the cantilevered rods were always a bit too wiggly and couldn’t be used to tension the felt, so the felt always seemed too loose/droopy.
- The dark wool contrasted too strongly with the rest of the room’s dominant light color scheme.
- Something would need to be done to keep the “inside row” of felt attached to the corner — I tried a bit of double sided tape, but that kept unsticking (especially whenever the rods got jostled).
For this last point, I decided to try cutting a channel within a wood rod that I could thread the felt through. I briefly toyed with the idea of getting a CNC router, but my new Amsterdam apartment didn’t have a giant closet suitable for building a sound-deadening enclosure.
Luckily, I found a CNC router in a 15th century city-gate and managed to talk my way into using it:
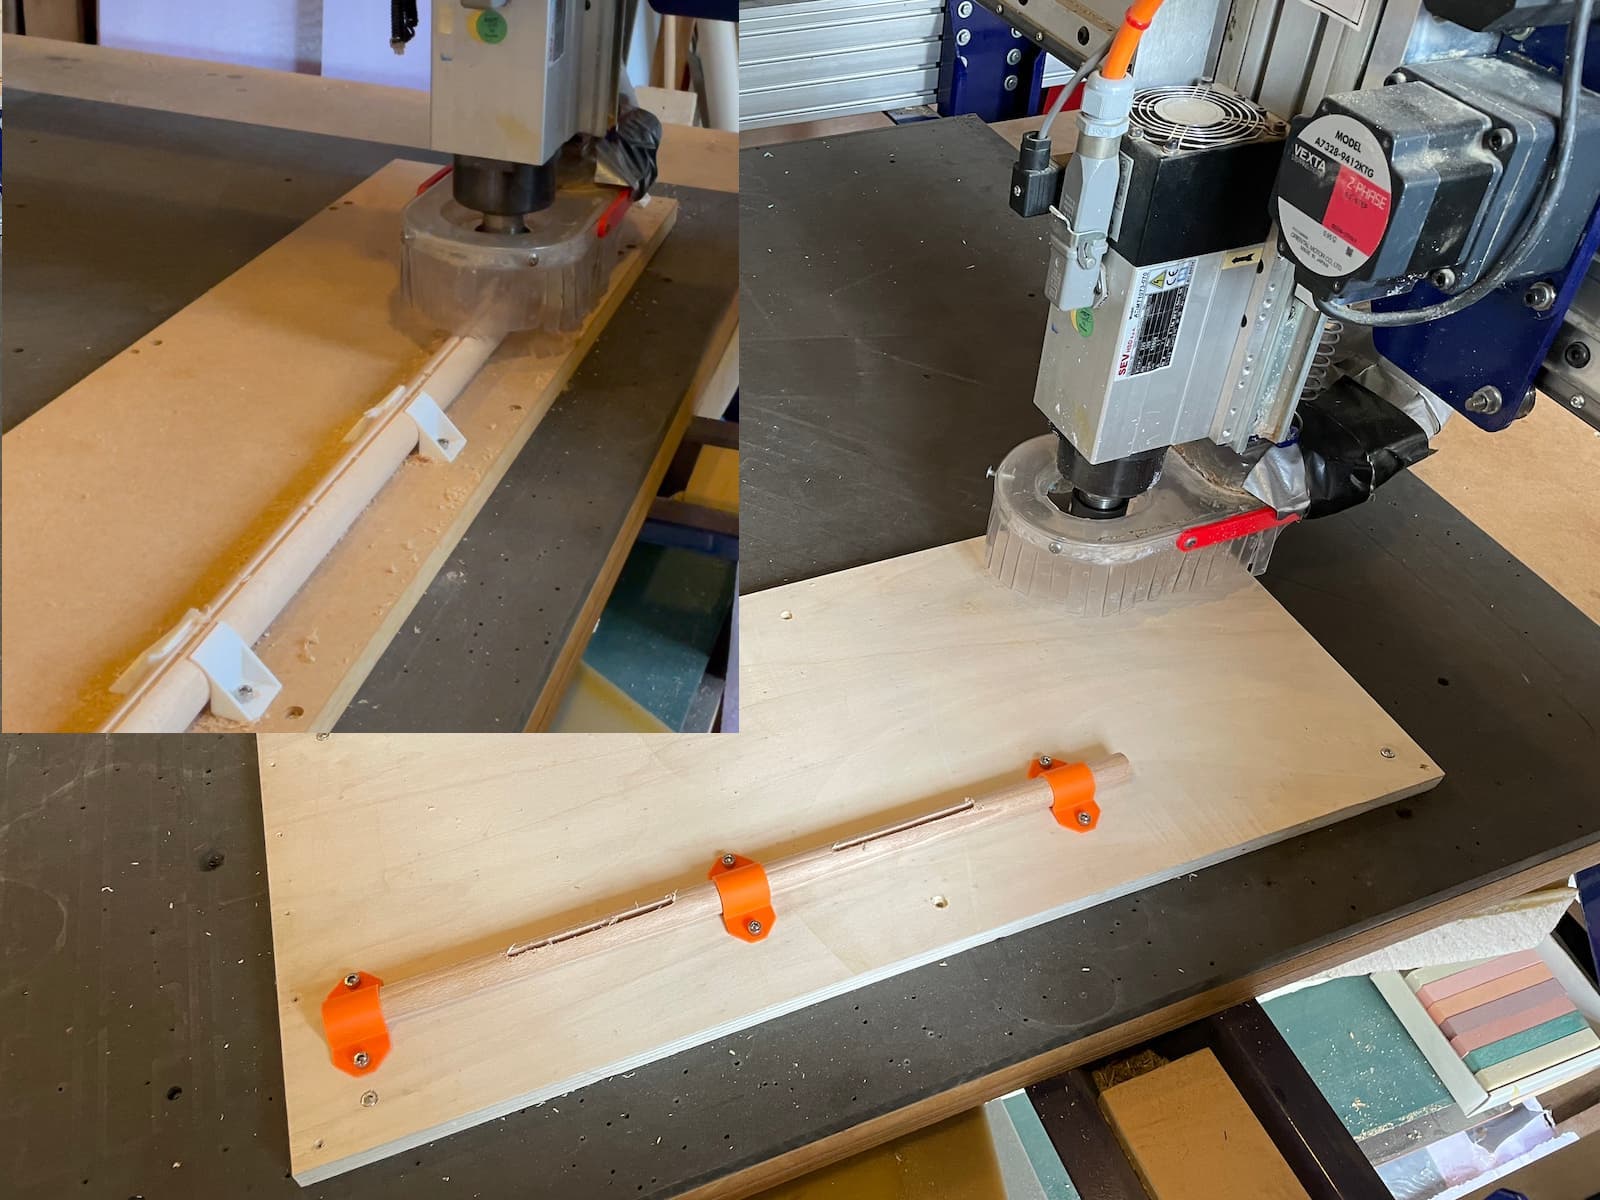
Let me tell you, having a 3d-printer is an absolute game-changer when it comes to clamping stuff to a CNC. The white “let’s hold both sides and cross our fingers” fixturing setup above for cutting the long groove really shouldn’t have worked as well as they did.
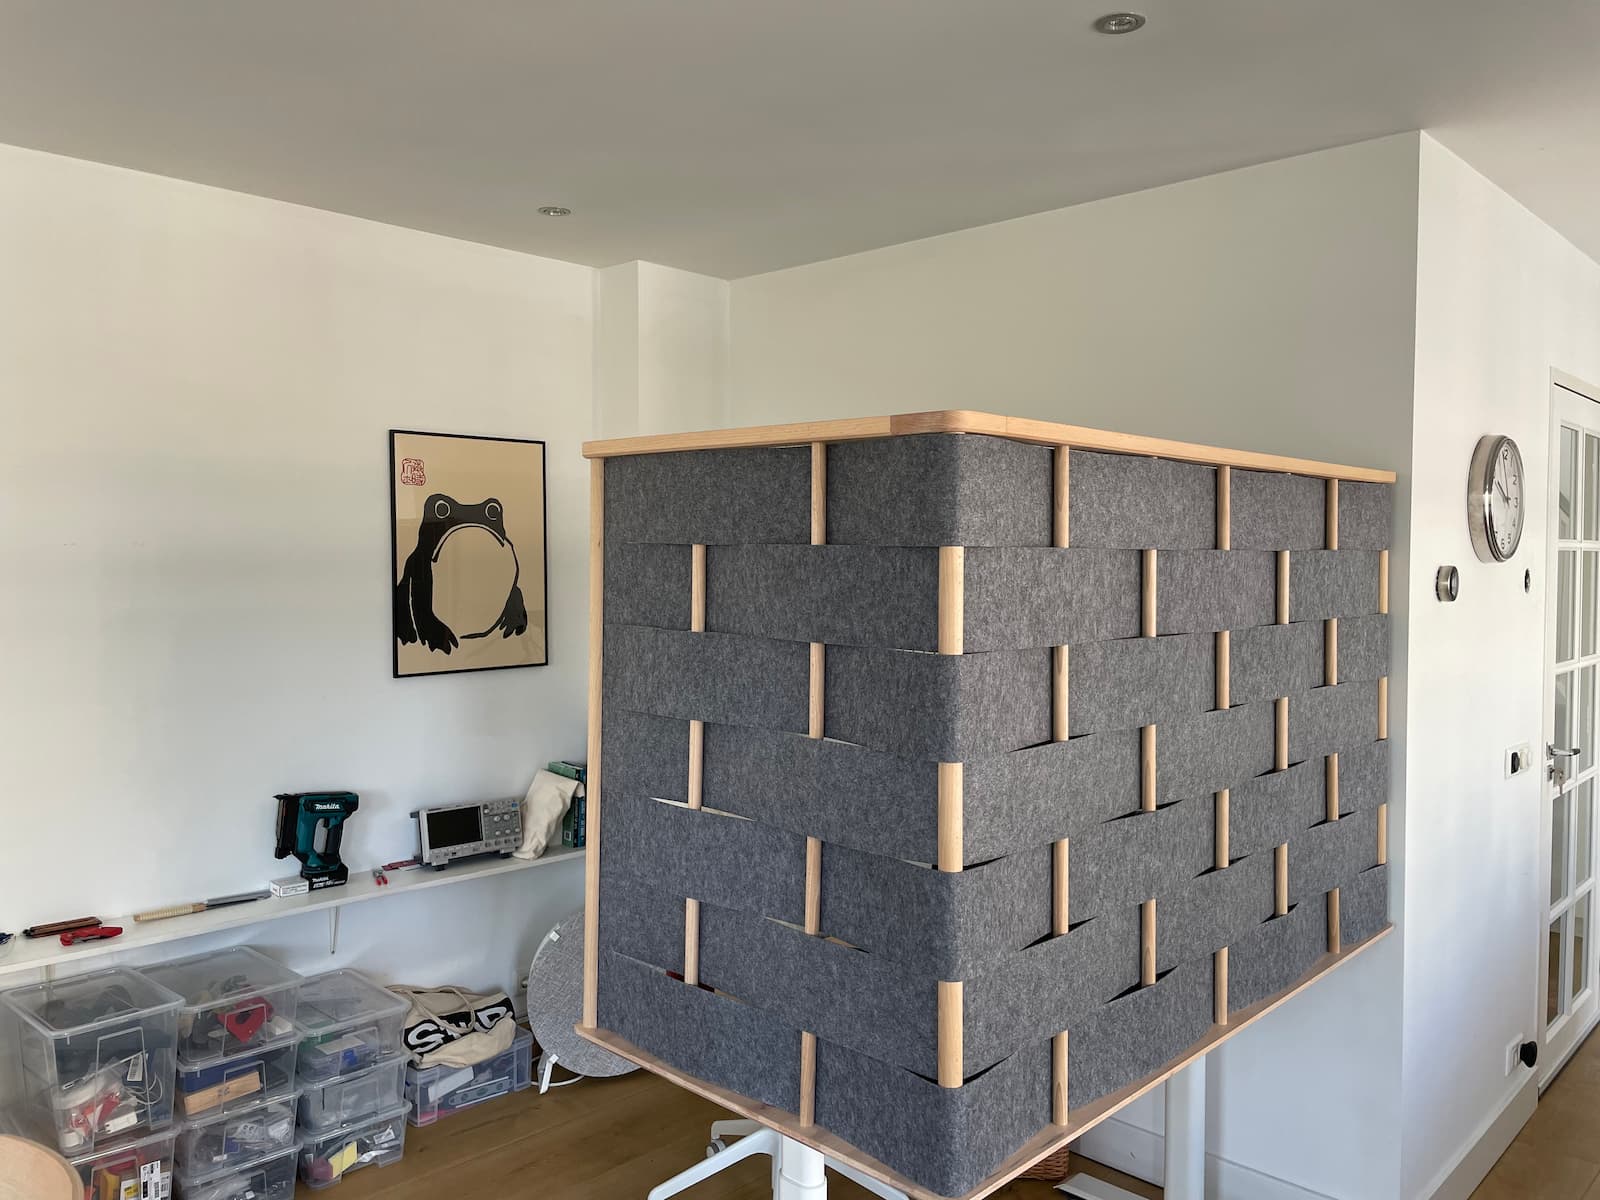
I’m particularly pleased with how the threaded corners turned out:
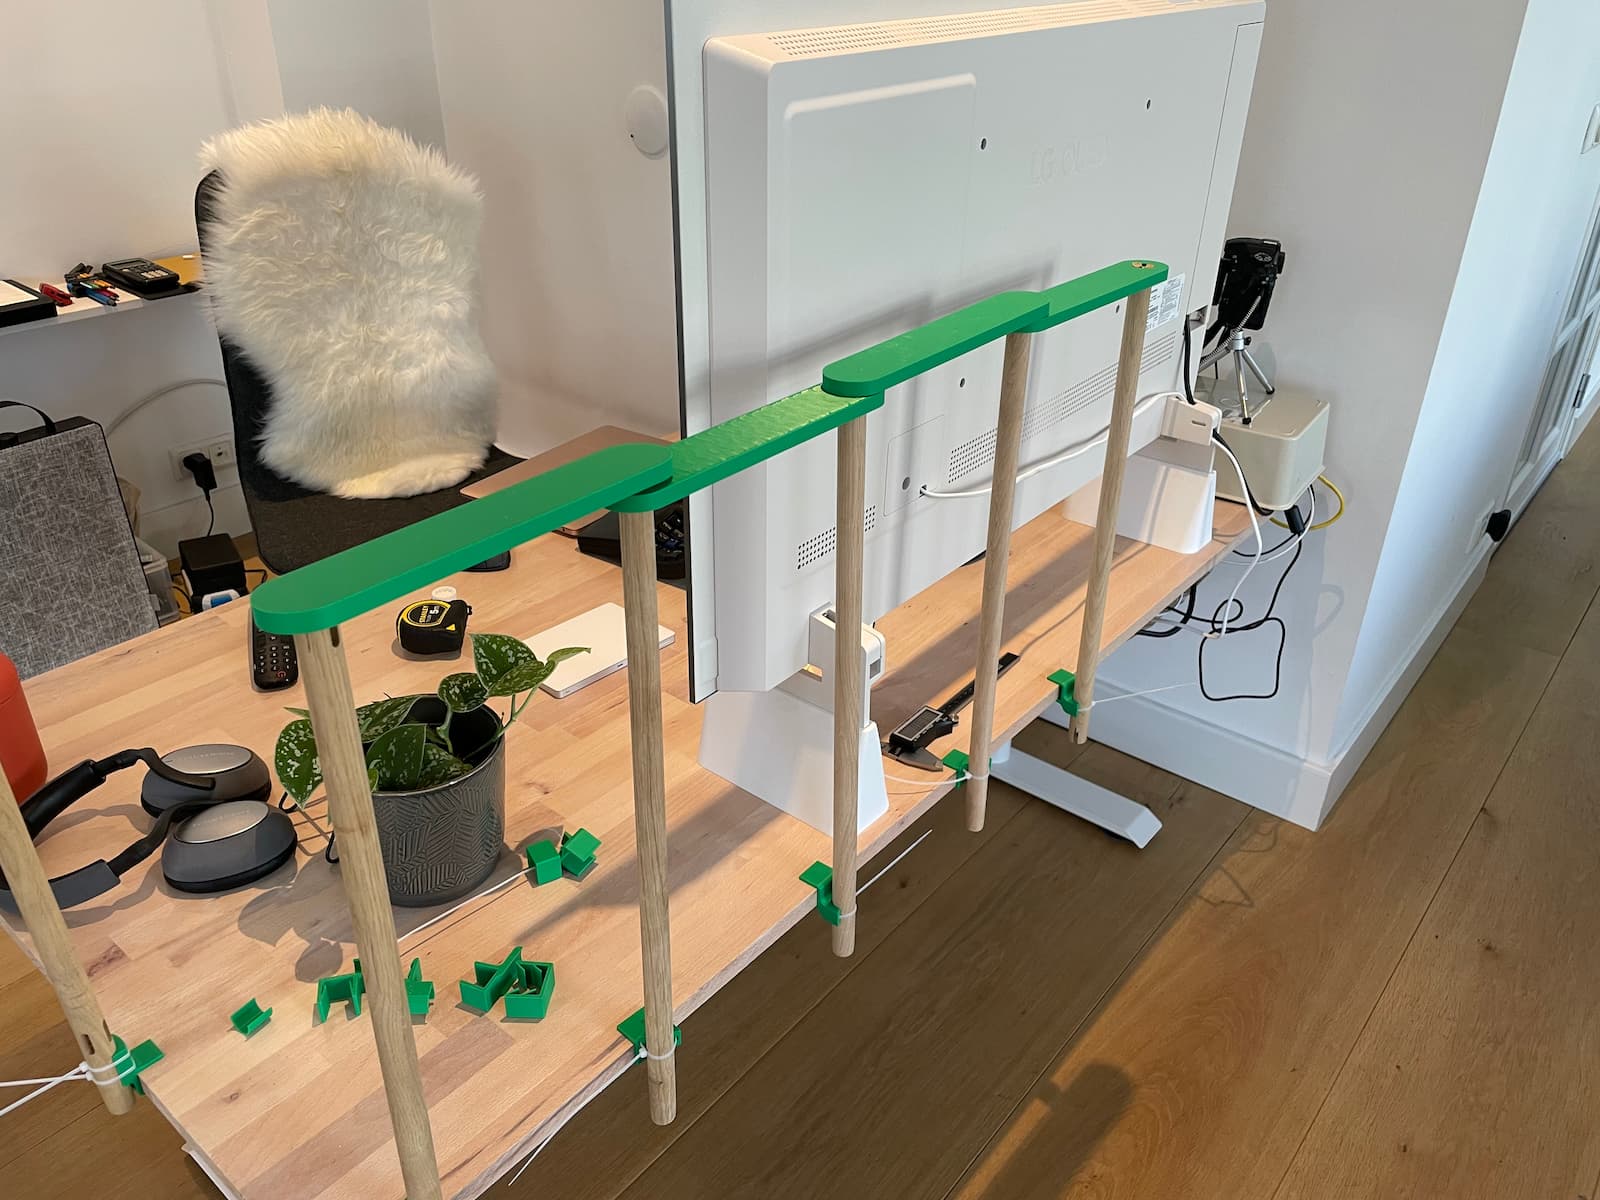
To fabricate the top rail, I considered using a handsaw, dowel joints, and a Kevin’s-hands-controlled router with 3d-printed templates, but my girlfriend strongly suggested that it might be time to hire a woodworker with a proper shop rather than making sawdust in our apartment.
The first woodworker I emailed referred me to his shopmate who, no joke, was 3d printing jigs as part making woven furniture. He gave me a crash course on using his giant sliding table saw:
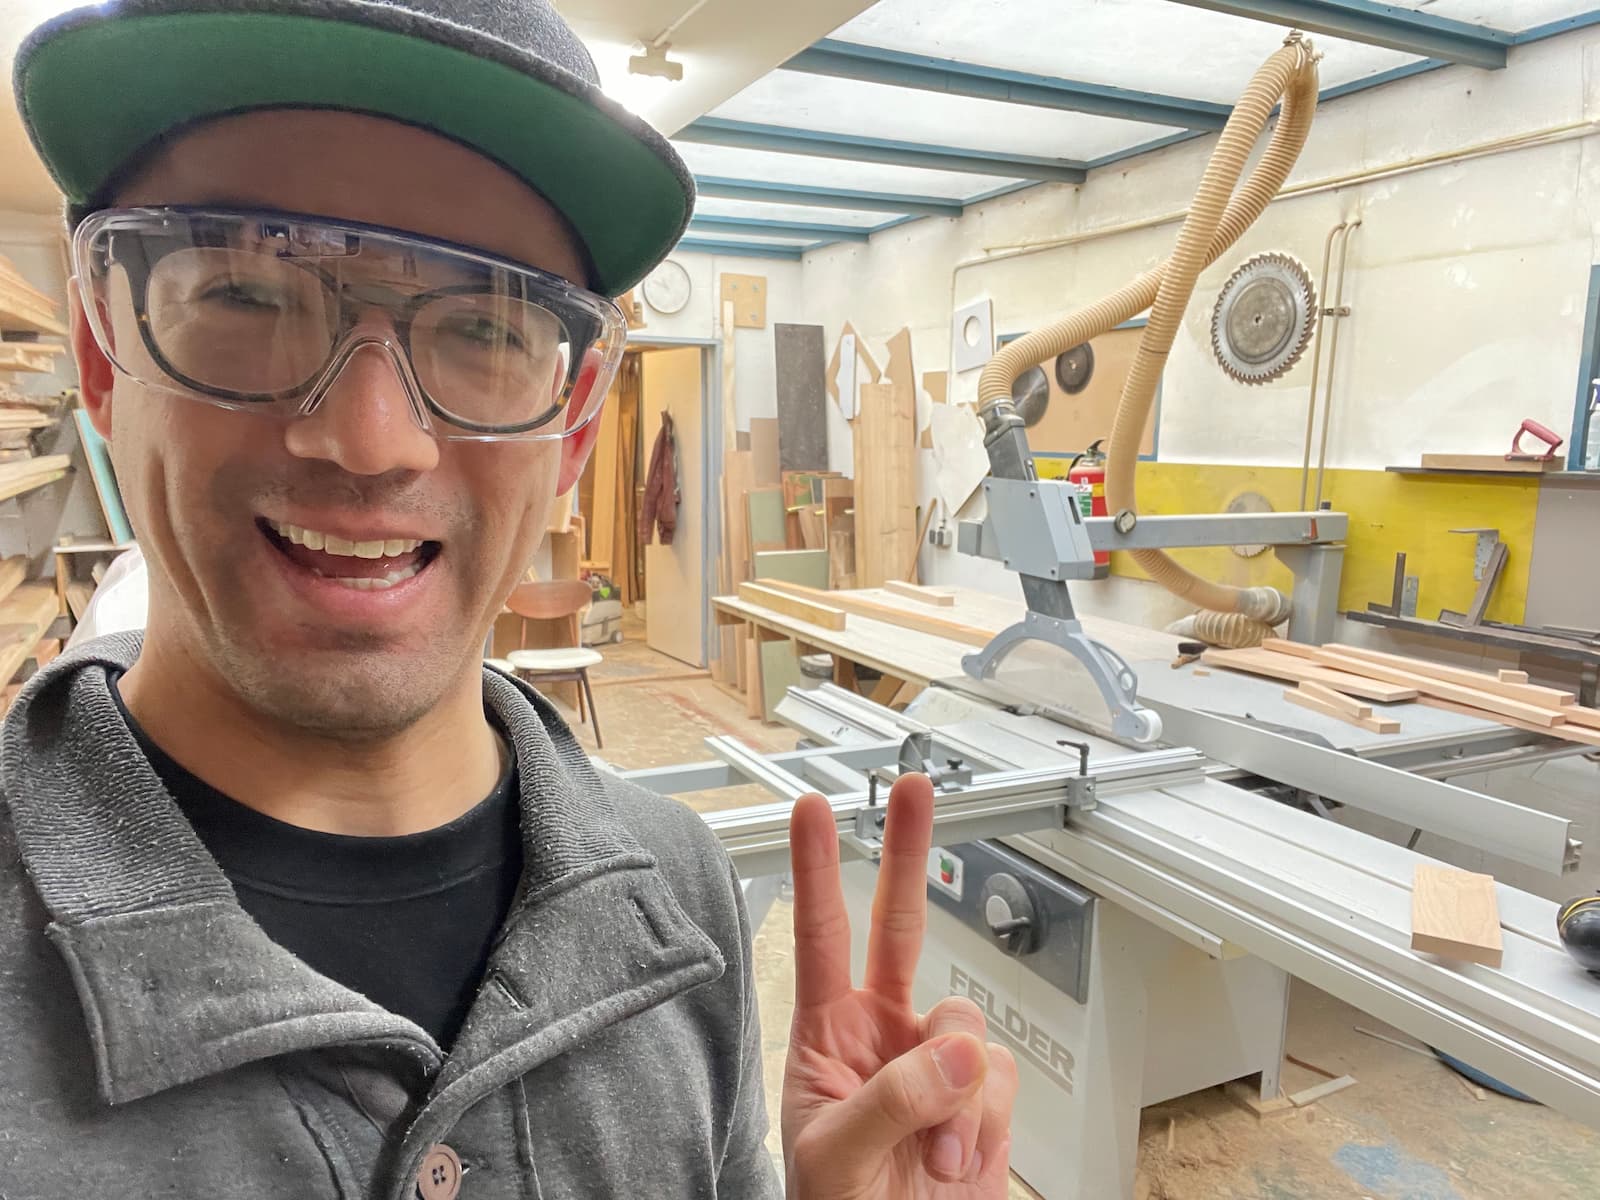
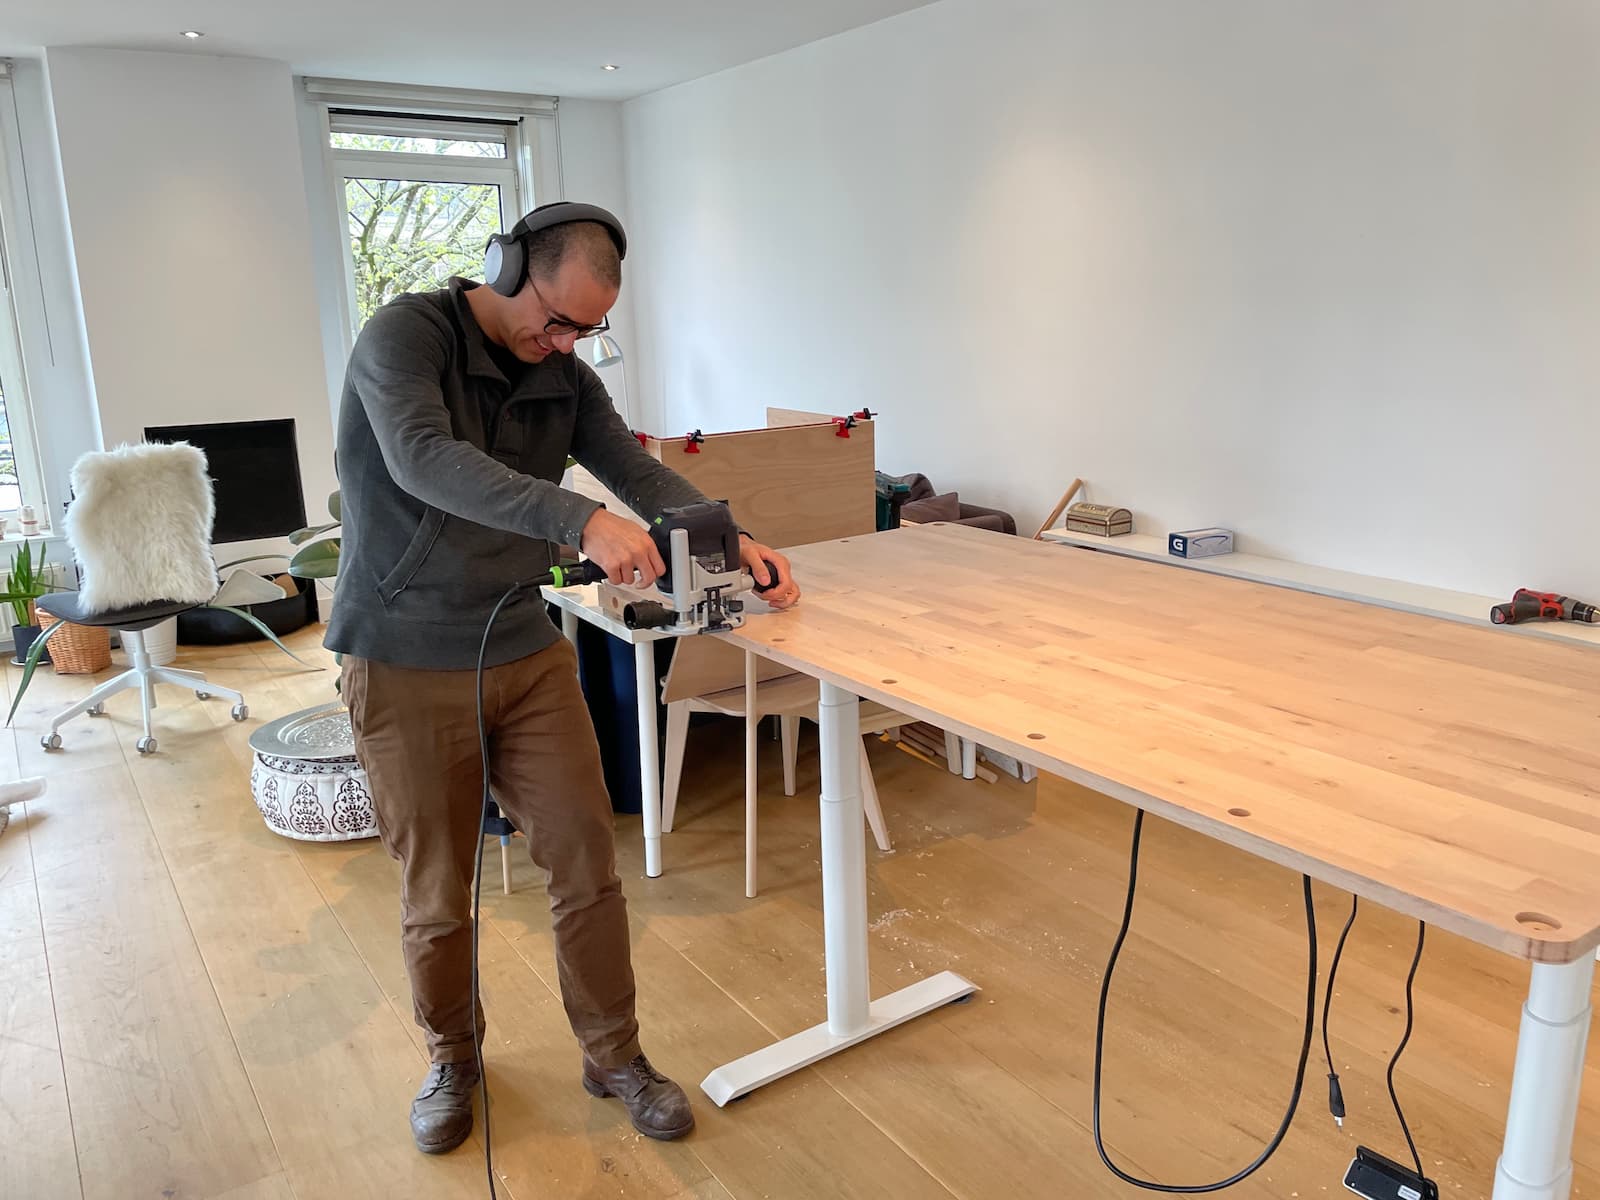
He also showed me how to use his fancy Festool router to make sawdust in the living room (sorry girlfriend):
Fabrication details
A forstner bit and portable drill guide were used to drill 20mm and 30mm pockets in the desktop with an M5 clearance hole.
The thinner wood rods have threaded inserts at both ends; the rod is screwed into a threaded rod in the top rail:

The bottom of the rod is pressed into a desktop pocket and secured via M5 machine screw from underneath the desktop.
Since the larger wood rods have a defined angular position (so their grooves are oriented with the felt), they can’t be screwed into the top rail; they’re simply friction fit and then pressed into the desktop pocket and fixed via screw from underneath the desk.
I used these generic Amazon/AliExpress M5 softwood inserts in 7mm holes:
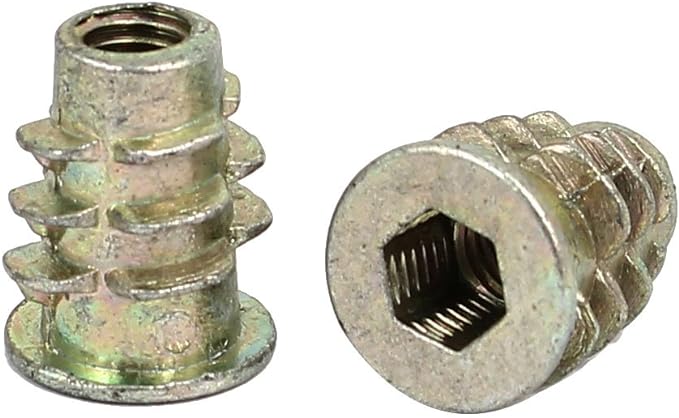
These work great in MDF/plywood, but they were a huge pain to screw into the beech. (I split two of the inserts!!!) Next time I’ll probably source hardwood inserts from Rampa.
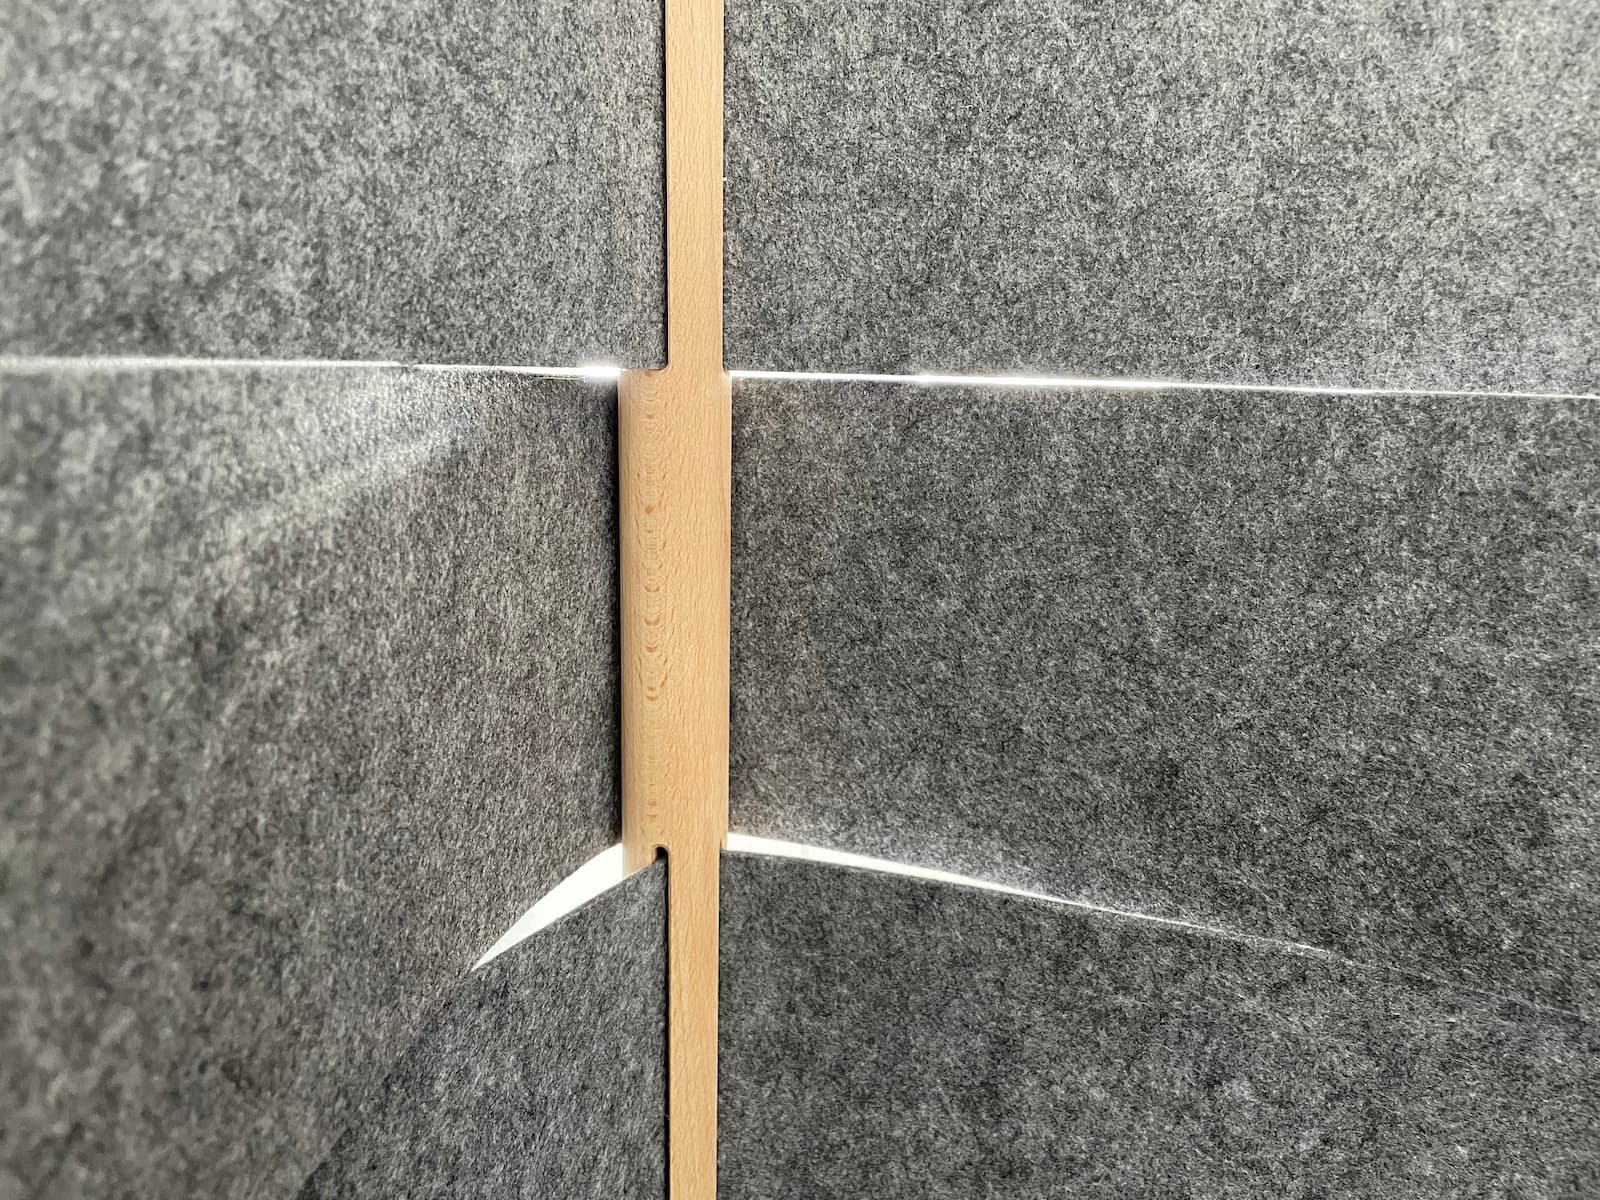
The felt is simply folded over itself and friction fit into the terminating rod groove:

The original dark felt was a 3mm thick, 400 gram/m2, 70% wool / 30% polyester blend. However, I found it a bit too floppy and switched to a lighter gray felt (3mm thick, 580 gram/m2, 100% polyester) which was substantially stiffer and gave a much crisper look.
The standing desk legs are the FlexiSpot E8 paired with an 18mm thick, 160 x 80 cm beech panel from Praxis’s hout op maat service.
The wood rods are beech, 20mm diameter in the field and 30mm in the corners, from Aduis.nl.
Everything was finished with Osmo Polyx Hard Wax Oil with white tint (3040c) which you really should (as everyone online and the can itself says) apply very thinly lest you get a few white splotches that you need to sand away. (Ask me how I know.)
The 42" LG OLED television that I use as a monitor has four M6 mounting holes on the rear, which I’m using with a piece of MDF and a gazillion zip-ties to hide a PC, surge protector, KVM switch, and miscellanious electronic sins:
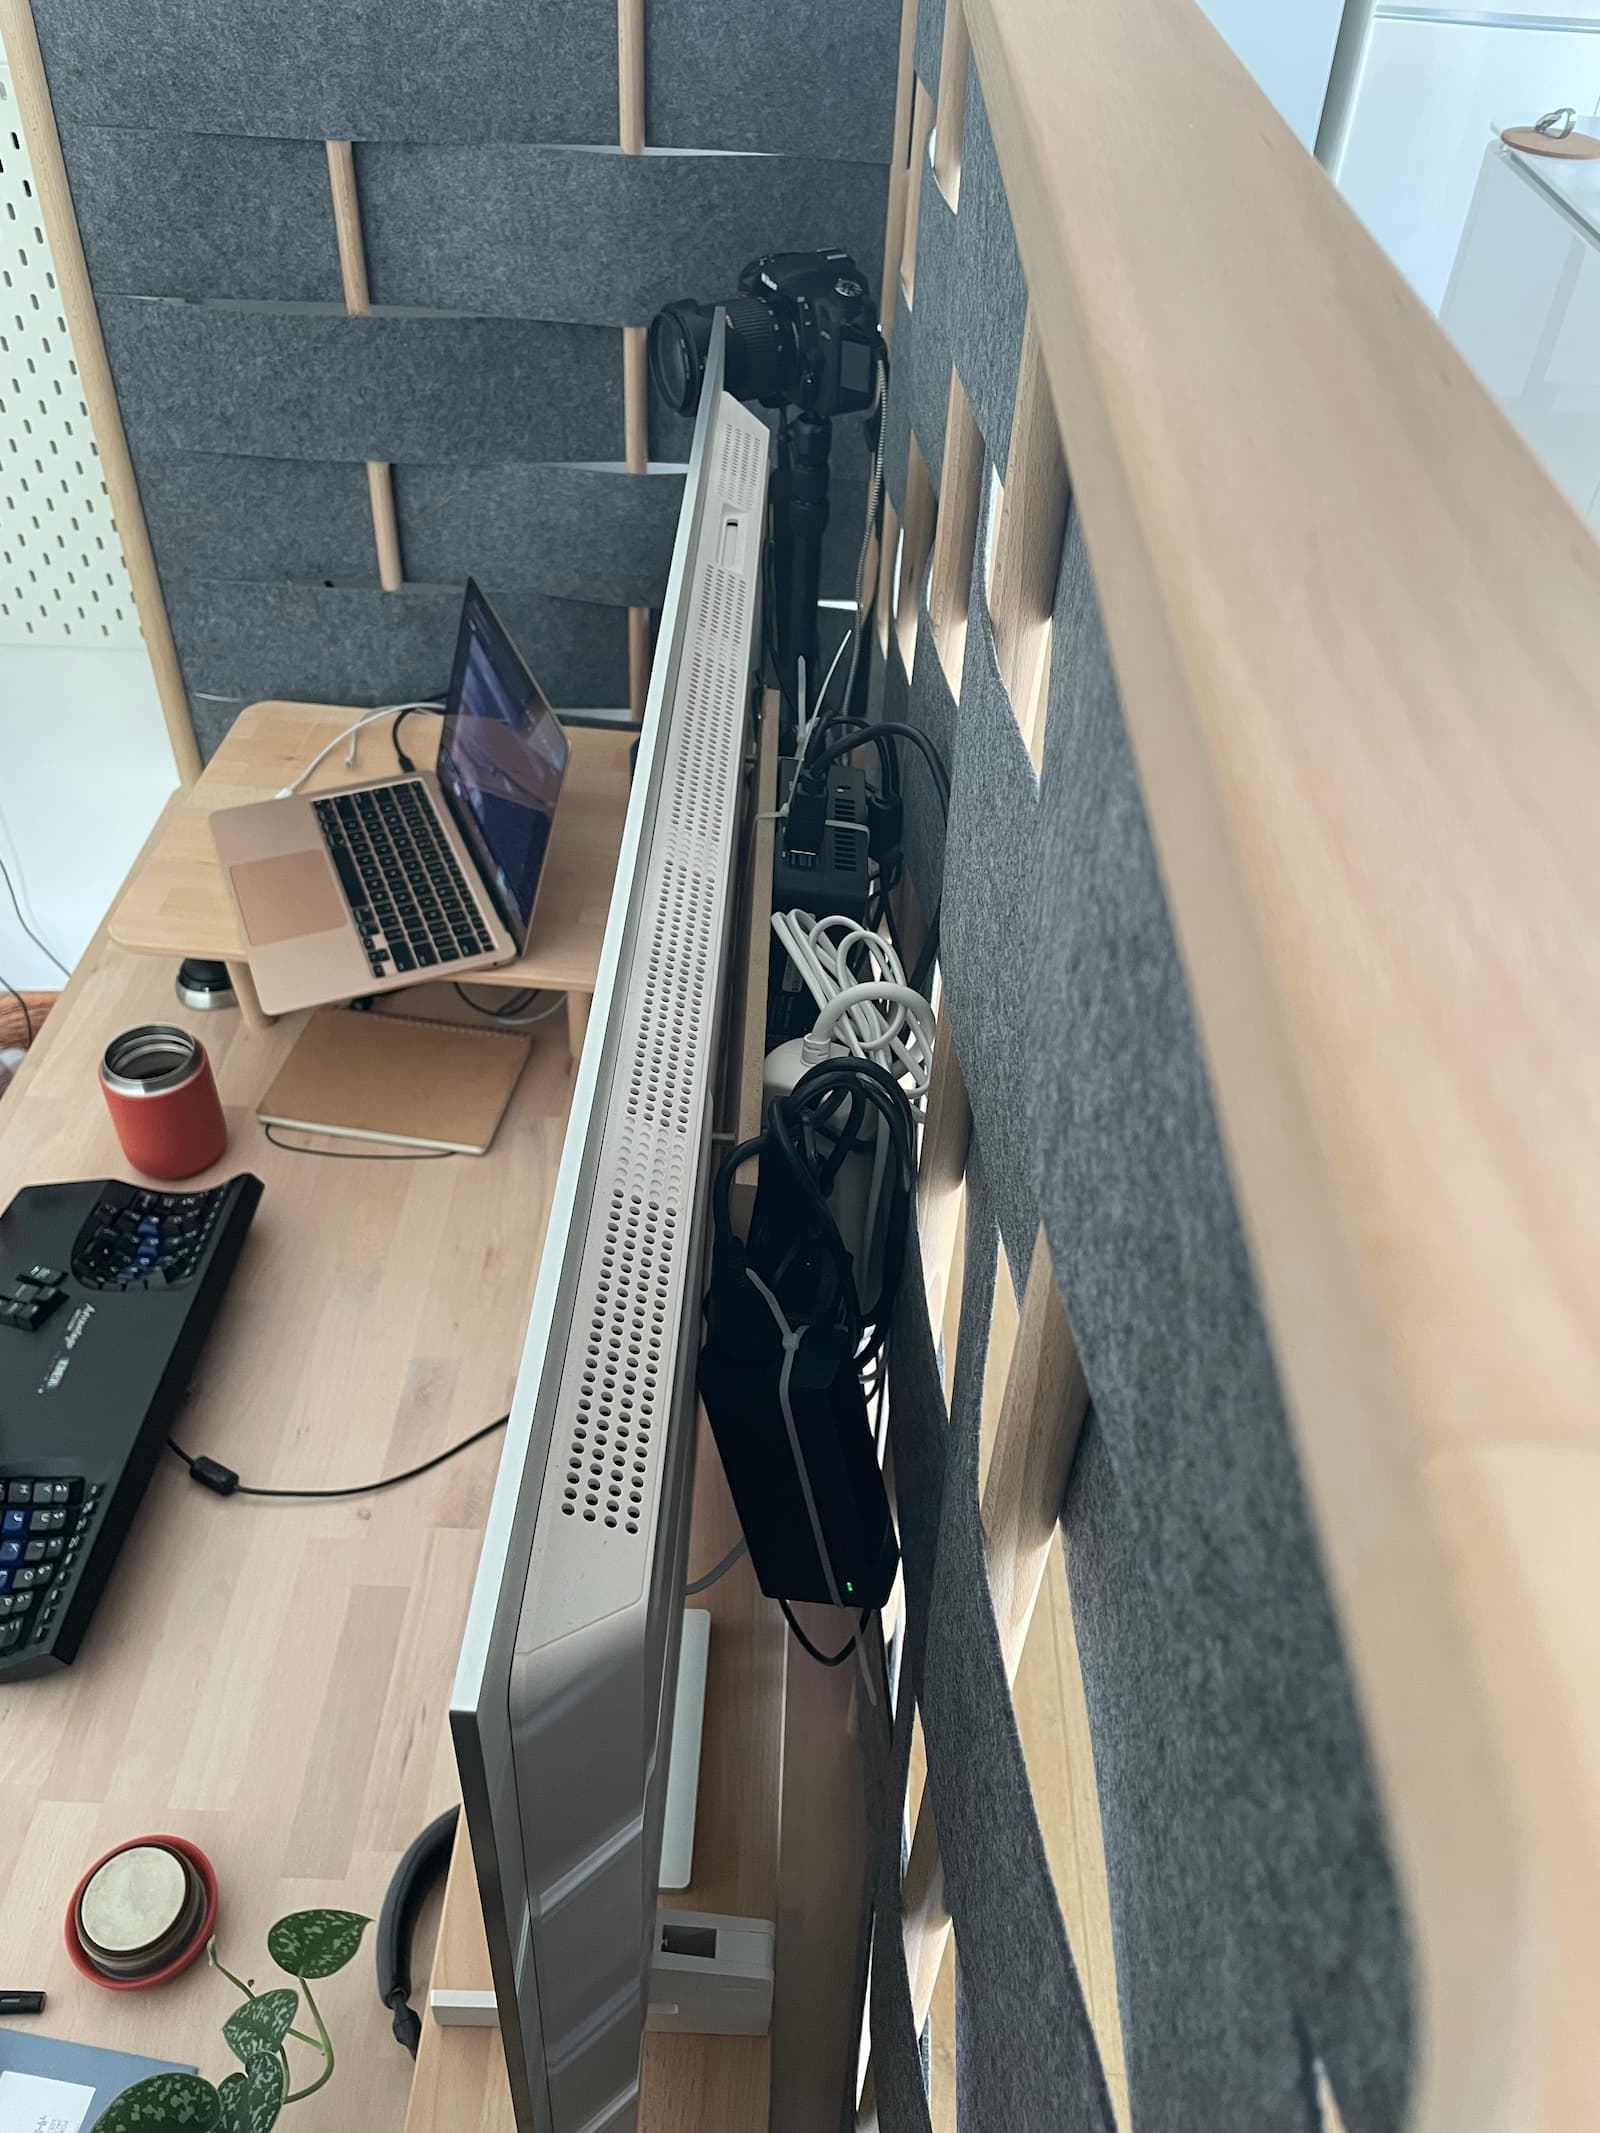
Only two cables escape the desk (power and ethernet), both plugging into the wall behind the Ikea pegboard, which is hung on a black metal TV mount the previous tenant and landlord kindly left attached to the wall.
Thanks
In order of appearance:
- Nicki, for allowing me to commandeer our apartment’s single closet for my 3d-printer and not getting too upset about the occasional sawdust.
- Toby, a newsletter subscriber who’d also moved from London to Amsterdam (!!!) for kindly lending me a big box of tools as soon as I arrived here.
- Henk of Fablab Amsterdam at Waag Futurlab for generously letting me goof around on their CNC router.
- Daniel at Nature Boy Carpentry, for accepting my (presumably unorthodox client brief) to collaborate on a half-finished design, teach me on his workshop equipment, and convincing me to add chamfers and roundovers to my desktop (which absolutely does make the whole thing look way better).
Next projects
What should I work on next?
Pass-through 4th-axis/indexer: Since we discussed last issue, I designed and 3d-printed an ER-style collet to hold 30mm wood rods, which felt secure enough for CNC routing — all that’s left is to combine with a belt, stepper motor, and housing built around a 50-ish mm inside diameter ball bearing. Having just finished my desk, though, I don’t have a context of use anymore, so this one may stay on the back-burner until a suitable next project — perhaps something that requires screw threads to be machined into wood, like this amazing machine fabricating the parts for a modular wood rod shelving system?
Portable “multi-function table” (MFT): Something in the style of the Paulk Smart Workbench / New Brit Workshop work table / 10 Minute Workshop portable bench — i.e., a precision grid of holes into which I can add bench dogs and clamps and make precision cuts easily with a track saw. I’d specifically want something I can carry up/down the narrow stairs to my roof patio. Though I’m on the fence about whether it’s worth setting up a space for casual / spur-of-the-moment woodworking in my apartment versus just doing the more deliberate upfront planning to rent a day-at-a-time at a shared public workshop or paying 5–10x material costs to have everything CNC cut and delivered from an “online sawmill” like Zagen Zagen or Adzaagt.
2020-extrusion positioning system: Looking at MFT fence designs got me thinking about precision positioning systems again. Five years ago I built a receiver for Vive’s “Lighthouse” VR positioning system, but for a slider along an extrusion rail I think it’d be cheaper and more accurate to leverage an electronic-caliper-style capacitive mechanism. One can already buy $50 meter-long DROs (digital read outs), though whether they can survive shipping from China is an open question to me. There’s a $140, 1.5m fence system on Amazon, so this is clearly doable. It might be fun to design an open source “maker version”, using shorter PCBs that can be stacked end-to-end within aluminum extrusion profiles — with the right software and 3d-printed designs one could probably make arbitrarily long electronic positioning systems. (Of course, in stepper-motor-driven designs one can simply count steps, but for human-powered devices like workbench fences/jigs a capacitive readout might be handy.)
Modular CAD system: Like clockwork, every 50 hours I spend in Autodesk Inventor, I start to daydream about a lighter, faster, more casual CAD system. In particular after doing so much 3d-printing, I want a more integrated slicer workflow and ability to quickly throw together predefined subcomponents like threaded connections, mating dovetails, and flexures/clips.
Reuse is sorta achievable with Inventor’s “iFeatures” (e.g., a punch that creates 3d-printable thread geometry), but it’s clunky.
The programmatic approaches (e.g., OpenSCAD, CadQuery, replicad) aren’t compelling to me either; I’m quite attached to interactive UI and the constraint-based sketch paradigm. Perhaps it’s time to revisit CADtron?
Misc. stuff
A friend of a friend is building “60fps eink computers for knowledge work - think a Kindle on steroids, but then a whole computing ecosystem built on that principle.” Daylight Computer is launching in May and looking for a head of software; email Anjan if you’re interested.
KLM’s flight compensation process is much better than British Airway’s (that story): I filed via web form on Feb 13 for a cancelled Miami-to-Amsterdam flight and €600 landed in my account Feb 28.*
My friend Dave Albert helped me scratch a decade-long itch: Copy markdown from Emacs and paste it directly into GMail as a formatted message.
Importing Dafu 501s as Brooklyn Skippies, cost $4 to make, $11 to pick and ship.
Sam Tellman is an instrument builder working on a new kind of piano.
Inside Smashmallow, Silicon Valley’s Failed Marshmallow Startup
Muse retrospective - “if you’re buidling productivity software or a creative tool, maybe you can find a few useful lessons here.”
OK Go - Upside Down & Inside Out. Definitely worth watching behind the scenes.